Showing when a page last updated

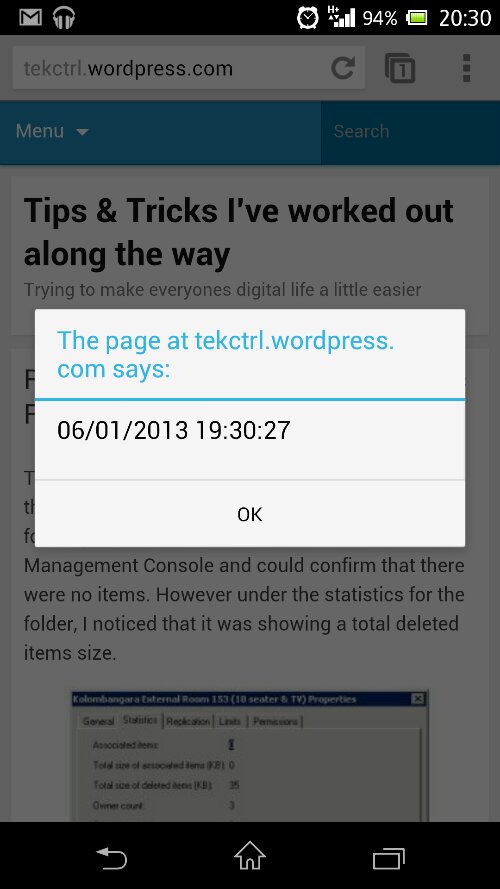
A handy little trick I often use to check on the last time a web page was last updated (handy when having to reference the site it check it’s activity)

javascript:alert(document.lastModified)

When using Chrome however, you need to manually type this in because when you copy and paste this in, Chrome will remove the javascript: section and therefore you’ll just run a needless Google search on “alert(document.lastModified)”

It even works in Android (Chrome for Android does not remove the JavaScript: entry either)

image

Give it a try and crack open a newly brewed Budweiser to celebrate (and don’t forget to check the born date on those bad boys just for consistency)

Restoring deleted items from Public Folders natively

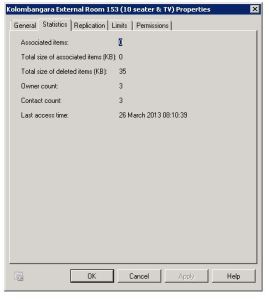
This morning I had a user call up and say that half the meeting room calendars (which are public folders) were empty. I checked via Exchange Management Console and could confirm that there were no items. However under the statistics for the folder, I noticed that it was showing a total deleted items size.

Deleted Items meeting room

I decided to check this out through ExFolders (Exchange 2010 replacement for PFDAVAdmin) and did come across a problem as I was getting the error “An error occurred while trying to establish a connection to the exchange server. Exception: the Active Directory user wasn’t found”. To get past this issue open ADSIEDIT and select Configuration from the Well Known Naming Context drop down menu. Then drill down to Configuration> Services> Microsoft Exchange> Domain Name> Administrative Groups> First Administrative Group> and then delete the Servers object. This can sometimes be left behind from old Exchange 2003 installs. As soon as that is gone then ExFolders can continue (please read the “read me” for ExFolders as it does specify to run the reg edit file and also to move ExFolders.exe to your Exchange location\bin\ folder, which is generally in <drive>:\Program Files\Microsoft\Exchange Server\V14\Bin. It will crash otherwise).

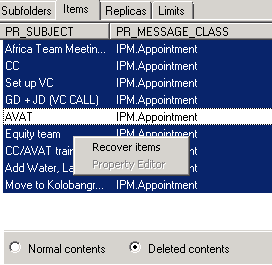
ExFolder Deleted contents

After finding one of the folders that had its content deleting I noticed that at the bottom, there is a “normal contents” and “deleted contents” radio buttons. Unsurprisingly, selecting “deleted contents” brings up the list of deleted items. To restore them it is a simple task of selecting the items, right clicking and selecting “restore items”. Bingo the items are back and I didn’t even need to get out of my chair to get to the backup tapes. Which is handy as it is in the opposite direction to the pub…


M Audio Delta card not working in OpenSUSE 12.3

Now I keep flipping between various Linux distributions. Recently I decided that I will run OpenSUSE 12.3 on my desktop and Ubuntu on my laptop. Now I have an old M Audio Delta 66 sound card, which I have ALWAYS had issues with (not only in Linux but Windows too from Vista upwards) and this was no different with OpenSUSE 12.3. There was no audio at all and I could not change any settings at all in System Settings > Sound (If I tried to load this up, it would crash).I ran lspci and could see the item was listed:

mike@Mike-Suse-PC:~> /sbin/lspci | grep -i audio
02:07.0 Multimedia audio controller: VIA Technologies Inc. ICE1712 [Envy24] PCI Multi-Channel I/O Controller (rev 02)
05:00.1 Audio device: Advanced Micro Devices [AMD] nee ATI RV770 HDMI Audio [Radeon HD 4850/4870]

Now I could see the sound card listed (Its the ICE1712 device) so I knew it was running at least. I’ve never been able to get this to work with pulse audio running so I removed this and installed alsa tools. To install this run the following:

sudo zypper install alsa-tools

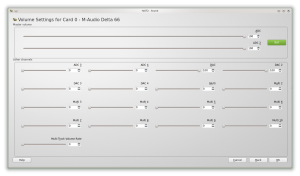
After this has been installed I was able to edit the various inputs I use through the card (I use the Omni Studio expanded unit also). Now it depends on how you have yours set up, though I use the monitor outputs for my M Audio BX-8a speakers (my setup in Yast is listed below and as you can see I just use the DAC outputs, which are the monitor outputs on the soundcard). I also removed Pulseaudio as I no longer required this

OpenSUSE Volumes

I also removed pulse audio since I was no longer using it, however you can leave it installed if you really want (to uninstall just run sudo zypper remove pulseaudio). Now for MP3 support you will need to install the codecs for these as free and open source software is not allowed to package these together. There’s two ways to do this:

The Easy way

Simply click on this link and it will install all the relevant codecs you need for multimedia playback (MP3 and DVD etc)

The Terminal way

To install all the codecs you need you will first of all need to run the following commands in the terminal:

Add the needed repositories (skip the dvd repo if you don’t need DVD playback)

zypper addrepo -f http://ftp.gwdg.de/pub/linux/packman/suse/12.3/ packman
zypper addrepo -f http://opensuse-guide.org/repo/12.3/ dvd
Now this will add in the repositories needed to install all the items you need and keep them up to date also. The next command you need to run will command OpenSUSE to install the various codecs you need:
zypper install libxine2-codecs k3b-codecs ffmpeg lame gstreamer-0_10-plugins-bad gstreamer-0_10-plugins-ugly gstreamer-0_10-plugins-ugly-orig-addon gstreamer-0_10-plugins-ffmpeg libdvdcss2
Now once everything is installed and you have some glorious music playing out, I’d say it would be prime time to grab a fine ale and save yourself 1p 😉

Time and Date missing from Ubuntu

I’ve been trying to use linux more and more as the command lines I know have always come in handy on some UNIX servers I’ve had to look after and macs also. So I am currently running OpenSUSE 12.2 on a laptop and Ubuntu 12.10 on my PC. I’m not sure how I did it, but while I was ripping bits of software out of Ubuntu, the time and date went missing from the top right hand corner of my display. I searched in Unity for Time and Date and alas it was not there.

Now since it was only the indicator that was missing, it was a simple case of re-installing the indicator again. To do this run the following command in the terminal

sudo apt-get install indicator-datetime

Now after you have installed this you have two options, either log out and then log back in again (bit too Microsoft-like for me) or you can kill off your unity program, which automatically restarts. To do this run the following command:

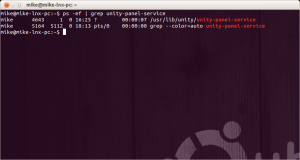
ps -ef | grep unity-panel-service

unity panel service

As you can see from the screenshot above, it will come back with the PID of the program (number next to the user) and the one you want to kill of is /usr/lib/unity/unity-panel-service. To kill this service off just run the command:

kill <PID you just discovered using ps -ef, which in my example above it 4643>

You will see unity close down, refresh and then the time will appear again in the top right hand corner. Now would be a perfect time (no matter what the time now says on your PC) to have a beer.

Windows 8 not showing your content in Music, Photos and Videos Apps

I recently upgraded to Windows 8 and have found it strange to get used to, from the Win + I to bring up options for apps to getting used to not having the start menu. However the biggest problem I had was opening the My Music, Photos and Video apps and it not showing ANY of my content. I’d read other users having this issue, but with NAS and other network shares etc but mine is stored on a separate local SATA drive. My Libraries were set to view this information and selecting my Music Library showed all this music that I couldn’t use in the My Music app.

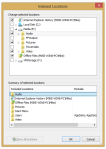
There is however a way to fix this! The Music, Photos and Video apps not only use your Libraries to gather media data, it also uses the Windows indexing tool. Now considering my media was on another drive and a while back (for whatever reason I cannot actually re-call) I had disabled the Windows Indexing from looking at my other drives so when I upgraded from Win7 to Win8 this area had never been indexed. So I went into Control Panel>Indexing Options>clicked on Modify and selected these extra folders. I then went into Advanced and kicked off a rebuild to hurry things along and start fresh.

Windows Index locations

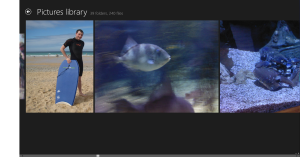
After a while of indexing I opened my media Apps in Win8 and the content was all there! Now once you open these applications they begin to then load up previews and thumbnails etc so again once you open the application you must wait a little while (my music took an hour to fully sort itself out) however once its all done everything is there in all its glory. No registry hacks or anything like that, just a slight tweak to what you want indexing. I think I still prefer how Zune works to the new My Music app as I can see much more, however I’m sure it (along with Windows 8) will grow on me. Now time for a beer or a lovely little glass of Glayva to celebrate 😉

Picture Library

loaded Picture Library

Find email address in Public Folders

Looking after several thousand mailboxes, public folders and distribution groups can sometimes make it difficult for you to keep track on where certain email aliases are assigned.

Now mailboxes, distribution groups and mail contacts are easy as you can add a filter in the Exchange Management Console to find these, however the same cannot be applied for Public folders.

Once again PowerShell comes to the rescue in the form of the Exchange Management Shell. Running the following command will bring up all the details you need:

Get-MailPublicFolder email@address.com | Get-PublicFolder

This command will bring up the name of the public folder along with the parent path so you know exactly where the public folder lives by showing the folder name and the parent path so you can navigate to the folder in question.

output from Get-MailPublicFolder

Not only do you get to find the public folder you get to learn a little more about Power Shell with the nice “Tip of the day” that appear in the Exchange Management Shell

Now that deserves a beer!

WinSXS taking up space after Service Pack install

I was working on a users desktop the other day who had an SSD installed a while back (back when 128GB were silly prices!) and it could only hold 64GB and it was full (well around 500kb free). This meant her .ost for Outlook couldn’t expand, causing no end of problems for her. Cleaning out temp files and rebuilding the .ost managed to bring back around 2GB which just wasn’t enough really so after hunting around on the drive to find where the rest of the space had gone I found the WinSXS folder. Now this folder was changed from XP to Vista quite a bit from the old .INF files being in there in XP to .mui, .exe’s in Vista and beyond. This folder allows you to run application such as SFC (System File Checker) or when installing additional features and roles in Server 2008 etc. As handy as this is, it can take up a great deal of space, especially when Service Packs are installed (which was the case for this poor user). To help clean this folder up there is a handy tool built into Windows, which can be run from the command prompt (you need to run the command prompt in Elevated Mode to run. To do this, hold down shift and right click on the command prompt icon and select Run as administrator…) which does a nice job of doing it all for you. Please bear in mind after this runs, you won’t be able to roll-back from the Service Packs. The command to run is below:

DISM /online /Cleanup-Image /SpSuperseded

This will take around 20-30minutes to run (depending on the OS and how much space it can reclaim) and can usually bring back around 3-5GB, which is the perfect amount of time to crack open a can of beer 😉

WinSXS size before command was run
 
WinSXS size after command was run

Save As PDF not working in Microsoft Office products

Recently I had two issues to sort out in the office. The first was a few users from a group company that were having issues with some powerpoint files that used a truetype font. Powerpoint would get halfway and then crash every singletime. The second issue was in all Microsoft Office products where users would go to create a PDF by using the Save As… feature instead of using the print to option and using cutePDF or the Adobe PDF printers.

Both these faults started happening around the same time (Mid November) but I treated these as seperate issues to start as they came from different companies. I could replicate both errors on my PC and I didn’t have any pdf printers installed so it wasn’t an issues with either of those products. I decided it might be a Microsoft Office patch and went through each one and still no fix in sight.

I did one last check with another desktop of mine that hadn’t had Novembers patches installed and this had no problem at all with either of the reported faults. This gave me somewhere to look, which was in the set of patches released in November and I found the error. MS11-087 was released to fix a zero day fault in Windows that takes advantage of an exploit in the font subsystem (the worm is named Duqu so if you are a creative using TrueType fonts from any site known to Google be careful and make sure your Windows PC is running AV.) What this patch does is change the file permission for a file called t2embed.dll which lives in Windows\system32 (it also lives in the sysWOW64 folder for 64bit systems.)

and for those wanting to know how to how the Duqu worm works:
Druqu worm cover by MS11-087 patch

So to fix this issue you simply have to undo this permission change and give users read access to this file(s if you’re on a 64bit system) and the change will kick in straight away. Either that or you can down this .msi from Microsoft that does the exact same thing, just remember to run the command prompt as an administrator and run msiexec to undo the changes, and then relax and have a beer…

SQL Server not starting after an update

So this morning after the patch weekend following Microsofts Patch Tuesday I updated our SQL 2008 R2 server with a security patch (KB2494088) and rebooting the MSSQL Server service refused to work. It would start up but when trying to login all you got in the SSMS(SQL Studio Management Studio) was “login failed for user. Reason: Server is in script upgrade mode. Only administrator can connect at this time”

Upgrade script

And after 2 minutes the SQL service would stop. And you’re back to square 1. In the event log all i was seeing was the following two errors:

Script level upgrade for database ‘master’ failed because upgrade step ‘sqlagent100_msdb_upgrade.sql’ encountered error 598, state 1, severity 25. This is a serious error condition which might interfere with regular operation and the database will be taken offline. If the error happened during upgrade of the ‘master’ database, it will prevent the entire SQL Server instance from starting. Examine the previous errorlog entries for errors, take the appropriate corrective actions and re-start the database so that the script upgrade steps run to completion.”
and


Cannot recover the master database. SQL Server is unable to run. Restore master from a full backup, repair it, or rebuild it. For more information about how to rebuild the master database, see SQL Server Books Online.

This is where i sh*t myself! After a quick trip i composed myself and decided to try a rebuild of the database. In SQL 2005 and SQL 2008 R2 i know its different that SQL 2000. To do a rebuild in SQL Server 2008 R2 i used the installation media ( you can use the local setup file which lives in C:\Program Files\Microsoft SQL Server\100\Setup Bootstrap\SQLServer2008R2) and used the setup.exe file and ran the following command:

SETUP.EXE /ACTION=REBUILDDATABASE /INSTANCENAME=mssqlserver /SQLSYSADMINACCOUNTS=”DOMAIN\administrator” “NT AUTHORITY\SYSTEM” “NT SERVICE\MSSQLSERVER” /SAPWD=sapassword

This ran successfuly (it didnt come up errors once it has run) but alas the same problem, so rebuilding the master database didnt work.

What did work for me was stopping the MSSQL service and starting it up again by using the below commands:

>cd “C:\Program Files\Microsoft SQL Server\MSSQL10_50.MSSQLSERVER\MSSQL\Binn\”
>sqlservr.exe -c -m -s SQLinstance
>sqlcmd -S SERVERNAME,1433 -E
 

Now the switches on sqlserver allow it run not as a service (-c) and in single user mode (-m) and the -s allows you to specifiy the server name. Running SQL in single user mode means no-one can login normally and allows SQL to get on with its upgrade script in peace.

I left this to run for around 15 minutes (if its a busy SQL server you’ll see many attempts of other servers/workstations logging in. To stop this i just pulled the network plug as I was working locally. If you need to remote on don’t do tis…for obvious reasons :p) and after this finished and I can could see the upgrade script ran successfully I was able to start the SQL service up in the Services.msc and login OK using the SSMS. No need to re-run the patch or roll back and get screamed at by any developers (which could of been the case for me)

After this fault happened I now always allow SQL to start in single user mode after an update/upgrade so it can run these scripts peacefully. Its not really needed and its mainly me siding on the side of caution but it never hurts 🙂